A
discussion on how to decide upon the order of Terragen image
composition
From
time to time people seek advice from experienced Terrageneers
about how they should proceed when developing an image.
Now
let me make this point very clear right from the start: there's
not THE way. Anyway, it's good to understand the impact that each
component - terrain, water, atmosphere, surface and lighting has
on the each of the other parts.
We
had this discussion in the german forum recently (and more than
once) and I decided to write up a summary, especially for people
that are new to Terragen.
The logical way
From
my point of view, there's a logical way one can follow when developing
an image in Terragen. It is this one:
1.
Get or design your terrain of choice. Once you have it, make sure
you're satisfied with the extend and height of the terrain features.
The extend is controlled by the terrain size and the meters point
spacing (mps). When you increase the mps, your terrain is enlarged
virtually in meters. The TG Units stay the same. It is important
to decide upon the final metrics of the image at this early stage,
since changes to the size of the image later on will result in
a totally different effect of the atmosphere, for the relative
sizes and distances might dramatically change - but the settings
in the atmosphere dialog do not. All other parameters do adjust
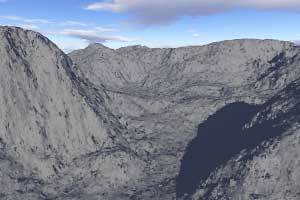
according to your changes in the mps. Here are two images, only
with different mps:
| Image
one, 2 mps: |
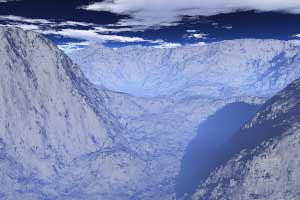
Image
two, 200 mps: |
 |
 |
2.
Find your final camera postion. This might turn out helpful for
the further development of the image components. Besides from
that, it is the most important step in image composition overall
(IMHO).
3.
Develop the final atmosphere. This means, when you're done with
this step, you're not going to make any major changes to the clouds,
the sun dialog and the atmosphere dialog. Of course, this step
depends on the type of image you are creating. When you use heavy
decay, or sunrays and a low shadow lighness, it would be a pain
if you had the surface ready at this stage, and find yourself
looking for a good cloud formation, which allows for the illumination
of the nice looking areas of the image. A heavy decay impacts
the appearance of the surface very much, too.
4.
Now you're up for the surface map. Make it the way you want it
to look like and refrain from using only two layers or so. That
would be a waste of opportunities. Spend time on this feature.
5.
Go for the water. You might adjust the water settings at any stage,
I think. I just put it at the end for no specific reason
The intuitive way
It
is quite common to first fix the terrain, camera and water, then
the surface map, then the atmosphere and clouds. Somehow, this
seems to be a more intuitive way to proceed in image composition.
But be aware that you might spend much more time with this approach.
In fact, many people do a bit terrain modification, then a rough
surface map, than some clouds and rays, then go back to the surface
map, then redo some terrain features, then the water, and after
all a final surface map..... or other variations.
The
bottom line is: there is no rule, since it is the fun of creation
and the final result that counts. You can do it any way you like.
But from now on, don't complain when a modification in one parameter
changes your image - you have been warned ;-)
Frank
Basinski
|